General Tsao’s Chicken

Like many of you, my favorite Chinese take out dish is General Tsao’s Chicken.  I’m also a big fan of chow mein, fried rice, beef and broccoli, and egg rolls.  But I don’t think I’ve ordered Chinese take out without getting some form of General Tsao’s Chicken.  There’s just something about that crispy breaded chicken slathered in that sweet and tangy, sometimes spicy suace that gets my taste buds going.

Now, I’m pretty sure that even though it is a “Chinese” dish, I’m almost positive that they don’t have General Tsao’s Chicken in China.  It’s one of those dishes that is totally Americanized, but we like to pretend that we’re actually eating Chinese food.

I was watching a segment on TV one time where these journalists were walking around some of the busiest cities in China handing out fortune cookies asking the locals if they knew what it was.  Almost 100% of the people they talked to had no clue what a fortune cookie was, and the ones that actually took a bite were shocked to find a piece of paper inside the cookie.  If that doesn’t give you a clue as to where our “Chinese Food” actually originated, I don’t know what does.

Ok enough rambling.  Now that I’ve completely gone off on a tangent, how about a delicious new recipe to add to your repertoire?  Can you guess what that recipe is?  That’s right!!!!  General Tsao’s Chicken!  Did the title give it away?

Here’s what you’ll need: (serves 2)

  • 2 boneless, skinless chicken breasts
  • 2 Tbsp sherry
  • salt
  • 1/3 cup cornstarch
  • 1 cup broccoli (chopped)
  • 1 cup green or red bell pepper (chopped)
  • peanut oil, enough to coat the pan (I didn’t have this so I used olive oil)
  • 1/3 – 1/2 cup General Tsao’s sauce (found in the international foods aisle at your grocery store)

Chop bell pepper into thick strips (about an inch thick).


Then turn the pepper to the side and chop again into bite sized pieces. (Steve took this picture for me so I could use both hands…..how nice of him!)


Here’s a nice little pile of chopped bell pepper.  This Christmas, Steve gave me a new WONDERFUL lens for my camera, as well as a tripod, so my pictures are turning out clearer than ever!  Thanks, Baby!


Next, chop up some broccoli into bite-sized pieces.


Chop your chicken into……you guessed it…..bite-sized pieces.  Place in a bowl, add the sherry, and mix around with your fingers so that each piece of chicken is coated in the sherry.  Let sit for 15 minutes.  (You could do this step first so the chicken can marinate while you’re chopping your veggies, but I was waiting for my chicken to defrost, so that is why I waited until now).


Add cornstarch to a plate.


Once the chicken has finished marinating, add to the cornstarch and toss to coat.  Make sure every piece is completely covered and there are no wet spots.  You may want to scoop the chicken out of the bowl by hand instead of just dumping it onto the plate.  It will probably help keep the wetness to a minimum.


Add your cooking oil to a large skillet and heat over medium high heat.  Add your chicken in a single layer to the hot oil.


Make sure you turn chicken periodically during cooking so that all sides get browned.  Once chicken is golden brown, remove and transfer to a paper towel lined plate.


Add broccoli and peppers to the hot skillet and let cook for about a minute or so.  If you like your broccoli a little softer and not so crunchy, you can boil it for a few minutes prior to adding it to the skillet.


Add chicken back to the pan.


This is the General Tsao’s sauce that I picked up at the grocery store.  It was really tasty!  I had a recipe to make the sauce from scratch, but I couldn’t find one of the ingredients, so I decided to take the easier route and use the pre-made stuff instead of chancing that the absence of this one ingredient would completely ruin the sauce.


Add about 1/3 – 1/2 cup of the sauce to the chicken and veggies and stir to coat completely.


Doesn’t that just look divine!!!?  By the way….this is not a low calorie meal.  So just keep that in mind. 😉


Add chicken and veggies to a bowl on top of a fluffy bed of white rice.  The crispiness of the chicken really added great texture to the dish!  It is definitely a repeater meal in our house!  Enjoy!

Mom’s Deviled Eggs

At my parents’ church in California (the church where I grew up) my mom is famous for her Deviled Eggs recipe.  At many of the church events, parties, and potlucks, her Deviled Eggs are always requested.  And they are gobbled up within minutes of setting them out.  Her Deviled Eggs are honestly the best I’ve ever tasted, and this New Year’s Eve I whipped out the recipe she gave me and made them for myself for the first time.  Now I am happy to share them with you!

Here’s what you’ll need:

  • 6 large eggs (makes 12 Deviled Eggs)
  • 1/4 cup mayonnaise
  • 1 tsp apple cider vinegar
  • 1 tsp yellow mustard
  • 1/8 tsp salt
  • a few dashes of black pepper
  • a sprinkling of paprika

Start by hard boiling your eggs.  I messed up the first batch and had to redo this step.  What?  I had never hard boiled an egg before!

When your eggs are cooked and cooled, peel and cut in half lengthwise.


Scoop yolks out with a spoon and place in a small or medium bowl.  With a fork, mash your egg yolks until they are in little crumbly bits.


Add mayo, mustard, vinegar, salt and pepper.  Make sure you measure out the vinegar.  I eyeballed it and it ended up being a little strong in the vinegar department…..but still good!


I forgot to take a picture while I was mixing the egg yolks with the other ingredients, but you should mix it first with a spoon or fork, and then if you have one, mix the rest of the way with an immersion blender.  It really helps get all those lumps out to create a smooth yolk filling.

Add the mixture to a piping bag with a small star tip.  You can also cut the corner of a Ziploc bag and use that as your piping bag and tip.


Pipe the filling into the empty egg halves into a swirly shape.  It helps if you have an egg platter so your eggs don’t wobble around when you’re trying to fill or transport them.  (Thanks for my egg platter Aunt Diane!)


Sprinkle each egg with a pinch of paprika and you are ready to serve…..and eat!!  Delish!!!


And I will leave you with Lazarus’s first picture of 2012.

P.S.  I took all these pictures with my new Canon 24-70mm F/2.8 camera lens that my wonderful husband gave me for Christmas!

Pumpkin Cream Pie

Holy Cow!  It’s been over a month since my last post!  I have no excuse except for the fact that I haven’t really been feeling that well due to this baby growing inside my tummy.  I’ve had these pictures ready to share with you since a week before Thanksgiving, but as usual, I have been procrastinating.  That, and my darling husband does not like it when I upload pictures while he is playing his precious Call of Duty.  He plays with his friends online, and when I upload pictures onto my blog it makes his game lag.  Heaven forbid!

Well luckily, he’s watching football right now with his parents (they’re here visiting for Thanksgiving), so I have some time to write a blog post without Steve complaining about how slow his game is moving.

I made this twist on a traditional pumpkin pie a week before Thanksgiving for our Bible Study’s Thanksgiving Dinner.  It was the first time I made it, and it turned out great, and it got several thumbs up at the dinner.  So if you don’t really like traditional pumpkin pie, maybe you’ll like this version a little better.

Here’s what you’ll need:

FOR THE CRUST:

  • 1-1/2 package Graham Crackers (about 15 Cookie Sheets)
  • 1/2 cup Powdered Sugar
  • 1 stick Butter, Melted

FOR THE FILLING:

  • 1 box (3 Oz. Box) Vanilla Pudding (Cook And Serve Variety)
  • 1 cup Half-and-half
  • 1/2 cup Heavy Cream
  • Pinch Of Cinnamon
  • Pinch Of Nutmeg
  • Pinch Of Ground Cloves
  • 1/2 cup (plus 3 Tablespoons) Pumpkin Puree
  • 1/2 cup (additional) Heavy Cream
  • 2 Tablespoons Brown Sugar

Preheat oven to 300°.

Start by adding graham crackers to a food processor and pulse until finely crumbled.  If you don’t have a food processor, you can put graham crackers in a Ziplock bag and pound them with a meat mallet or something else that’s good at pounding things into little bits.


When graham crackers are crumbled into tiny bits, add powdered sugar and mix until completely combined.


Add crumb mixture to a bowl and pour in melted butter.


Mix butter in with a fork until all the crumbs are coated.  Then pour into a pie pan.


Press crust down either with your fingers or with the bottom of a cup (I find using the bottom of a cup to be the easiest method) so that it is tight against the side and bottom of the pie pan.

Bake for 8-10 minutes, or until pie crust is golden and set.  Set aside and cool completely.


Next take your vanilla pudding…..and chipping nail polish….


And pour into a sauce pan.  Doesn’t it look pretty?  Almost like sparkly snow.


Add half and half and cream to the pudding powder and stir until combined.


Add spices and continuously stir until the mixture comes to a bubble.  Once you have it bubbling, turn off the heat…..but keep stirring.


Next comes the main ingredient.  Pumpkin puree!!!


Stir in the pumpkin until thoroughly combined.  This may take a lot of stirring because the pumpkin can make the pudding a little lumpy, and you don’t want any lumps.

Once pumpkin pudding mixture is cool enough, cover and place in the fridge to cool completely.


Add heavy cream to a medium sized bowl.


Add some brown sugar to the cream.


Then whisk together until stiff peaks form……be sure to stop when it looks like this.  Otherwise, you can whisk it too much to where it will curdle, and then you’re halfway to butter.  Learned that one the hard way!


Add chilled pumpkin pudding mixture to the whipped cream.


Gently fold the whipped cream into the pumpkin pudding.  Be sure not to stir too progressively.  You want to fold in gently to keep the fluffy airy quality of the whipped cream.


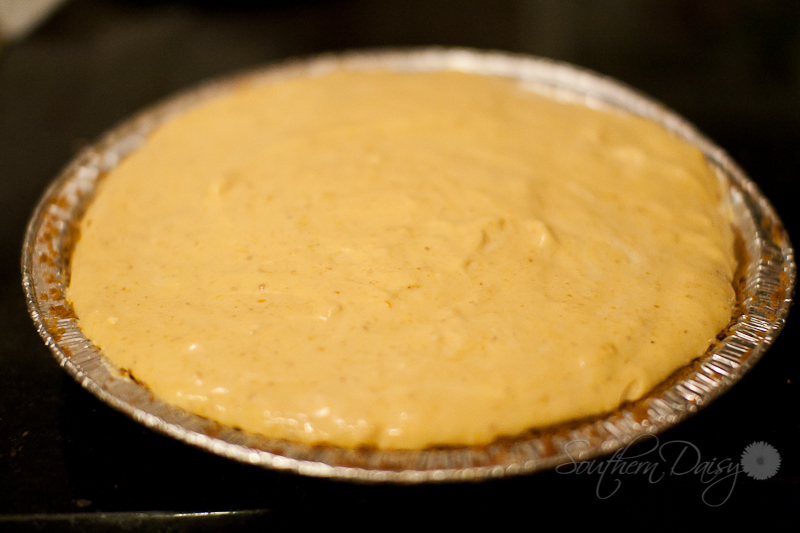
Pour filling into cooled pie crust.


Smooth filling so that it’s nice and even.  Then cover and chill in refrigerator for at least 3 hours.  If you have the time, it would be best to chill overnight.

Then slice up and enjoy!  You could add a little more crunch by adding some crushed graham crackers to the top of the pie once sliced.